Transfer Status Feature
Working with your transfers inside MyRapidi can sometimes get overwhelming when you have many different transfers on different stages - meaning that you might have transfers that are running live, some you still have in test, others that you still are working on or some that you don't use anymore.
To provide you with a better overview of the different transfers we are happy to introduce to you the "Transfer Status" feature which allows you to work even more efficiently with the transfers.
Overview
You will find the two main functions that helps you really take advantage of the "Transfer Status" feature on top of the transfer list page.
The new feature includes:
1) being able filter on transfer status using the filtering menu and
2) change transfer status via the action-panel
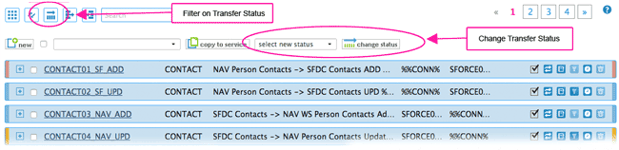
image 1: overview of "Transfer Status" feature - 1) filter on transfer status and 2) change transfer status
Color to indicate each transfer status
Implementing (color: red): This will be the initial status of your transfer. It indicates that you are in the process of setting it up and still working on this transfer.
Testing (color: orange): The next status after implementing will be testing. Setting the transfers to this status means you are testing it.
Ready (color: blue): This status means that you are done testing the transfer and either you have or your client has accepted the transfer. The 'ready' status means that the transfer is ready to use.
Live (color: green): This is a special status as you cannot change your transfer to or from this status manually. For a transfer to have the status 'live', it requires that the transfer is on a schedule. The system will automatically set the transfer to live when
1) it is on a schedule (and the schedule is not 'Stopped') and
2) the transfer is enabled.
When you disable the transfer or delete the schedule the status for the transfer will change to 'Ready'.
Archived (color: grey): This status is for you to use when you e.g. have made a copy of the transfer for reference purposes or later use.

image 2: the color code indicates the status of a transfer
You can hover over each transfer and it will give you information on the transfer code and the transfer status.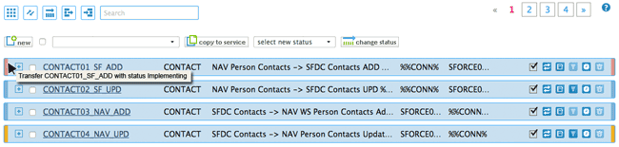
image 3: hovering over each transfer will give you information about the transfer code and the current transfer status
Change transfer status under 'General'
You will be able to see and change the status of the transfer going into the 'General' section on the transfer. Furthermore the color indication on the transfer status will continue as a color bar also when you fold out the belonging sections.
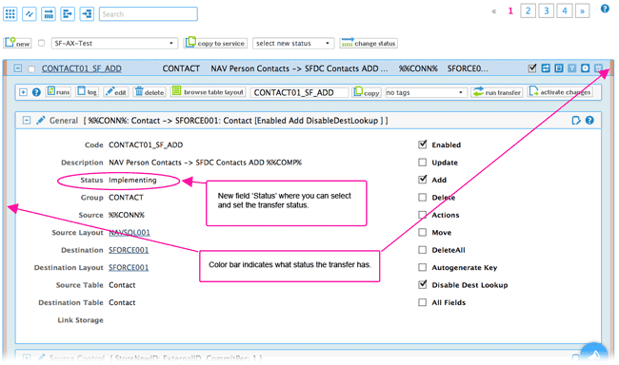
image 4: see and change transfer status under 'General'
Change status on multiple transfers
In your action-panel above the transfer list we have added the option to change status on multiple transfers. Select those transfers you wish to change by clicking the checkbox, choose a the appropiate status from the dropdrown and click the 'change status' button. This will change the status of multiple transfers altogether.

image 5: select multiple transfers and change their status
Change status on all transfers
In your action panel you will now see a check box which will give you the option to select all transfers on the page. This checkbox gives you the possibility to select (or deselect) all transfers on a page and change their status all at once.
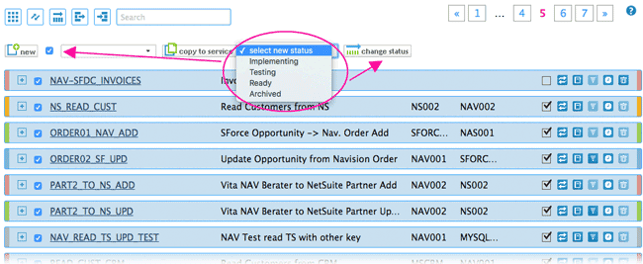
image 6: select all transfers and change their status
Work more efficiently using the filter "Transfer Status"
We added a new icon in the filter menu where you can filter on a "Transfer Status" and in that way get a quick overview of the different transfers and their status.
As a default it will show all transfers, we have added a special filter 'Not Archived' which will show you all transfers except those transfers that are set to archived.

image 7: filtering on transfer status
How to work with the "Transfer Status" feature
We have before raved about the filtering menu, but now you can work even faster with your transfers as you now can both filter on the "Transfer Status" in combination with e.g. "Groups". In this way you can obtain an even more granular view on transfers belonging to a specific group having a specific status.

image 9: leveraging the filter menu
The feature becomes really powerful if you use it in conjunction with e.g. the 'copy to service' feature.

image 10: copy multiple transfers to another service all at once
Voilà, this concludes the introduction of the Transfer Status feature. We hope you like this feature and that it helps you to navigate more efficiently the MyRapidi interface. Let us know what you think about this feature. Comments and ideas are as always welcome. :)
Read more on Transfer Status on our wiki.
BONUS: Would you like to get more familiar with RapidiOnline and MyRapidi interface? Take advantage of our Customer Success Team here at RapidiOnline and schedule a quick call with us to have a chat about how you can get the best out of your RapidiOnline Service.