In this blog post we will walk you through how you setup your Schedules with Tags and how you can add the Tags description to your existing Schedules.
How to Set up Your Schedules
Sometimes it can be difficult to distinguish between the different Schedules. Especially if you have many Schedules that use Tags. The Schedule code containing e.g. NAVSQL001 or NAVSQL002 is not really meaningful.
1) Add description to your Tag Values
After our latest release we have new possibilities on how to setup your Schedules. In order for you to take advantage of the new possibilities on the Schedules make sure that you have setup your Tags with a useful description under the Tag Values section. In one of our previous post you can read more about the Tag Values section with a description field.
The description has to be short (2-4 characters) but also descriptive to make it easy for you to identify the source or destination you are actually transferring data from and to. In the example below we have added a short description 'US' and 'FR' to indicate the different subsidiaries of the organisation (image 1).
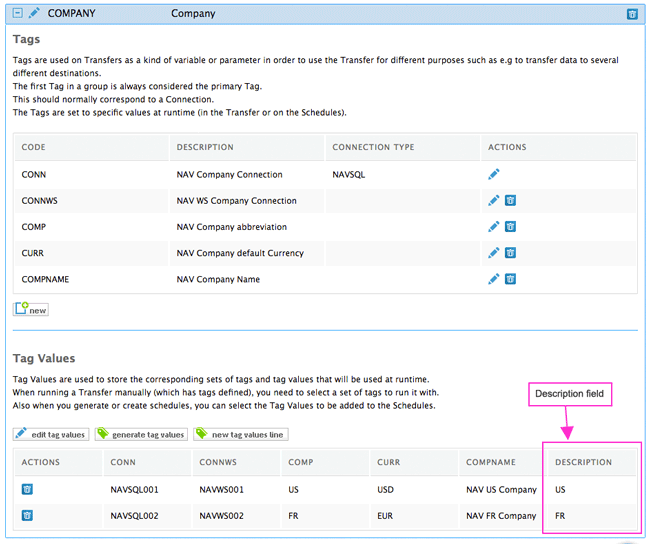
image 1: description 'US' and 'FR' added to indicate the different companies
2) Setup Schedules
Next thing you should do is to go to the Schedules and click the 'setup schedules' button to create new Schedules. You select your Tags and you choose either a single Transfer or a Group of Transfers that the Schedules should run. In the example below I have chosen 'Company - All Tags' and the Group 'CUST: Customer Transfers' (image 2).
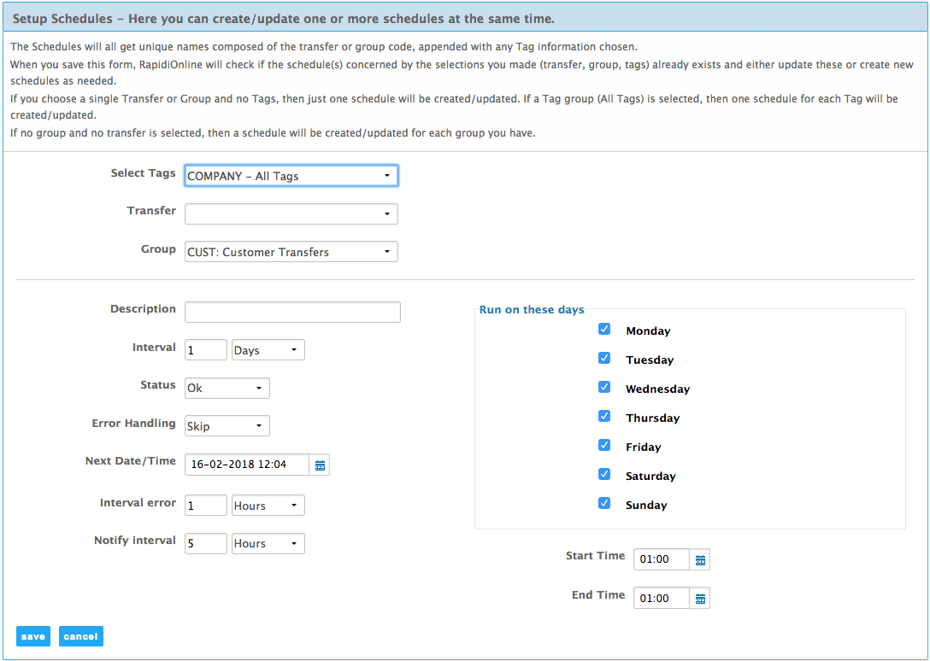
image 2: setup schedules
In this case this will create two new Schedules (as I have chosen 'All Tags') under the Group 'CUST' populating the Schedules with the Tags and Tag Values we defined under the Tags Tab (see image 3 and 4). You can see in the example below that the two new Schedules also include the description 'US' and 'FR' that we added earlier under the Tag Values. This should make it easier for us to distinguish between the different schedules and identify which company each schedule is transferring data from and to.

image 3: Schedules including the tag values description
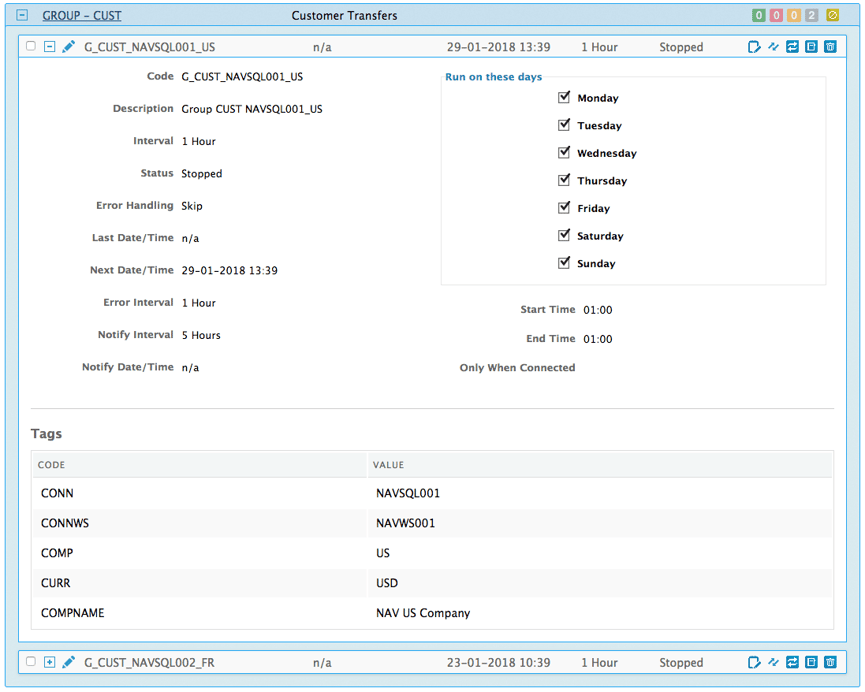
image 4: example of schedule (view mode) with Tags and Tag Values
Edit Schedules: Schedule Code now editable
It is now possible to edit or rename the Schedule code. Once changed, the Schedule code will also be automatically renamed in the Log. We have added a schedule code index on Log entries that will help in the performance.
You cannot change the start of the schedule code, e.g. G_CUST_NAVSQL001, but you can extend the schedule code with a description like e.g. G_CUST_NAVSQL001_US (the description should be uppercase and no spaces).
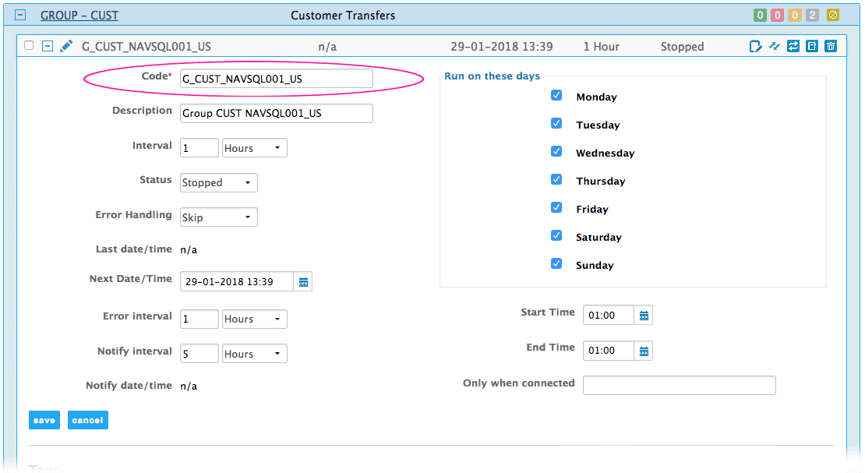
image 5: edit schedule code
NEW FIELD 'ONLY WHEN CONNECTED'
We also added the field 'Only when connected' to the schedule (show and edit). In this field you can specify a comma seperated list of RapidiConnectors. Normally you only specify one RapidiConnector. If you have specified any RapidiConnector(s) in that field the Scheduler will only attempt to run the Schedule if the specified RapidiConnector(s) are currently connected to the central Rapidi service. In this way you can avoid errors saying that the RapidiConnector is currently not connected. It is specially useful when the RapidiConnector is located on e.g. a laptop that is not always connected to the internet. Specify for example: NAVSQL001_R

image 6: new field 'only when connected'
IMPROVED ERROR MESSAGES
Also we would like to mention that we have improved the error messages that might occur when working with and editing the schedules.
Adding Tags description to existing Schedules
In the following we will explain the possibilities on how you can add a Tags description to your existing schedules.
To start with we have two scenarios:
Scenario 1:
You have set up a number of Schedules where you are using Tags and you are using e.g. a larger number of Connections and currently you can actually see and distinquish your Schedules as they are. Depending on how you setup your Schedules initially, in some cases you might have enough information to be able to distinguish them in a good way that works for you. In that case, we would recommend that you leave them as is and just ignore the description field.
Scenario 2:
You have Schedules that you cannot distinguish in a good way then you have two options:
Option 1: Rename each Schedule manually - as it is now possible to edit the schedule code field.
If you have Schedules that differ very much from each other (e.g. different interval or different time that they run) then we recommend to use this option.
Option 2: Set up new Schedules. Click the 'setup schedules' button to setup your schedules again with the needed information. Follow the instructions above on how to setup new schedules. When setting up your schedules via 'setup schedules' MyRapidi will look for existing schedules with the same name (but possibly without the Tag value description) and replace it with the new setup. If it finds an existing schedule without the Tag value description in the code it will rename the schedule.
If you have Schedules that are setup with the same information across all Schedules then we would recommend to use this option.
We hope you found this post useful. If you have any comments or questions please let us know.
In case you missed our Product Update Webinar. You can watch it here.