Please note: This blog post has been updated to a newer version please read this blog post: Passkeys: Easy, strong, and secure authentication
We are pleased to announce that we have implemented further security on MyRapidi, namely the possibility to use Security Keys. The feature will be released Sunday, November 21, 2021.
What is a Security Key
A Security Key is either a separate hardware device like the Yubikey (a USB key from Yubico) or a hardware chip built-in to your computer, tablet, or phone (like a fingerprint reader). The security device holds a private key and has cryptographic capabilities to securely sign messages during an authentication process.
The standards used for these Security Keys (called WebAuthn and FIDO2) are relatively new but are supported by industry leaders like Google, Apple, and Microsoft and built into recent browser versions of Google Chrome, Microsoft Edge, Firefox (Windows 10+), and Safari among others.
Many industry leaders already support the use of Security Keys for their different online services. For example, you find Security Key support in Google Gmail, Microsoft Azure Active Directory, Salesforce.com among others.
Why use Security Keys with myrapidi?
Security Keys (and using the WebAuthn and FIDO2 standards) provide a very secure way to authenticate yourself with an online service as a physical device like a Yubikey or fingerprint scanner is used during the authentication. This avoids practically all possibilities of account takeover.
A Security Key or device can be set up in two different ways with MyRapidi - either as Passwordless (no password is needed at login) or as a Second Factor (like the Google 2FA but more secure as it is a hardware key).
Passwordless authentication combines the use of a physical device (which has some unique key and the ability to securely authenticate with a service) and then some personal knowledge like a PIN code or a personal feature like a fingerprint.
So as passwords can be stolen or guessed (and used remotely), it is much harder for someone to get hold of both the piece of hardware AND the personal knowledge or feature (PIN code or fingerprint).
Even strong passwords used in combination with 2FA codes (like what we support with the Google Authenticator app) are less secure than using passwordless login. Hackers could steal your mobile phone number remotely and get access to your email account and then reset your password and get into your account. With passwordless login enabled (and Security keys enforced), they will always need the physical hardware key also!
How to enable security keys on MyRapidi
So how do you enable a Security Key for your login?
You need the following items to use a Security Key with MyRapidi:
- A browser that supports FIDO2. In general, regarding the latest versions of Google Chrome, Safari, or Microsoft Edge, visit this page for more details about FIDO2 and U2F support.
- A hardware key (like YubiKey) or biometrical devices like a built-in fingerprint reader in your laptop or mobile device.
Then to set up a Security Key with MyRapidi:
- Go to Settings > Security Keys
- MyRapidi will check if your browser is supported. If it is not supported, you will get a message about this.
- Then enter a name for your key (for example: "Beate's Yubikey")
- Check the box "Passwordless"
- Click the button "Add Security Key"
- Follow the steps provided in the popup browser window
- If the key is successfully added, you will see it in the list of active Security Keys
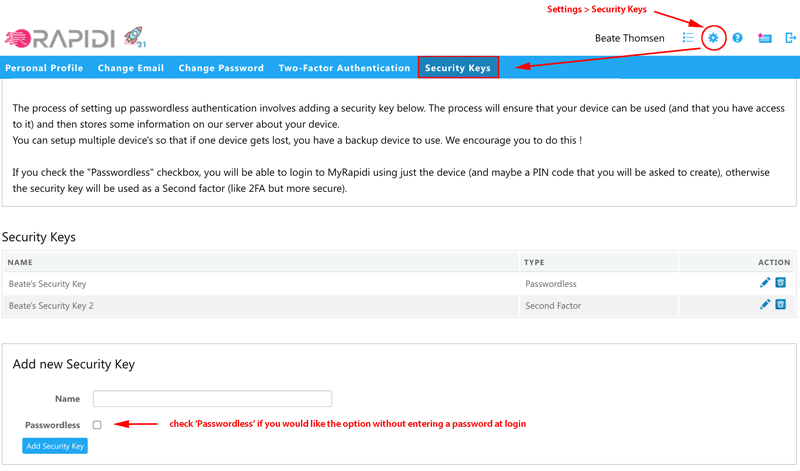
image: Settings > Security Keys; registration of your security keys
We recommend that you add at least two different devices so that you have a device that you normally use and a backup devise.
If you do not check the box "Passwordless" the key will instead be used as a secure Second Factor device. In this case, you still have to enter your password, and you then have a more secure second-factor authentication that MyRapidi will ask for after the password is entered.
Read more on our wiki: Security Keys
Enforce the use of Security Key
A system is only as secure as the weakest link and adding a security key is very good, but if you can cancel out of using the key and then login with just a password as before, then you do not really have a more secure system (but you do have a more convenient login method).
As an Account Administrator, you can enforce the use of a Security Key for a user. This means, that use of a Security Key always is required to log in to MyRapidi. This you can set up under Account Settings > Manage Users, where you have the list of users on your Account. Under 'Actions' you can enable and disable enforcement of the use of a Security Key for this user.
Again, to ensure the overall security of your MyRapidi account, it will require that you enable the enforcement of a Security Key for yourself first.
Enable enforcement for the use of Security Key for yourself as Account Admin
To enable the enforcement for yourself please ensure that you have added at least 1 security key to yourself (under Settings -> Security Keys), then you go to 'Manage Users' and click the key icon with the "+" for your user. A key icon with a "*" will appear in the 'Keys' column.
Please note that for security reasons you cannot undo the enforcement yourself. To disable the enforcement you will need to ask another MyRapidi Account Administrator.
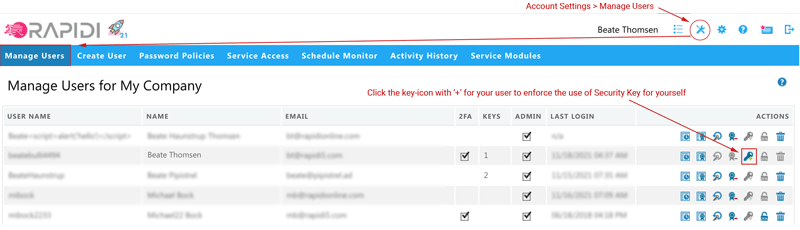
image - step 1: enforce the use of Security Key for yourself
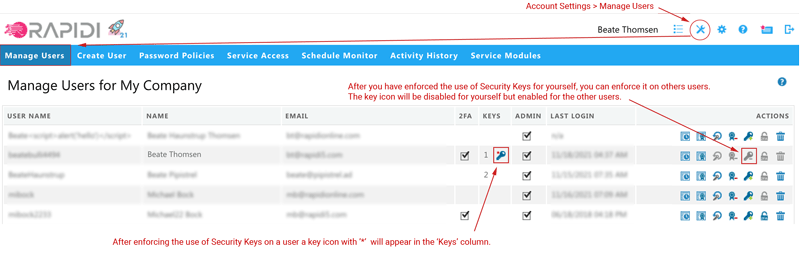
image - step 2: after enforcing the use of Security Key for yourself - the right to enforce it on other users becomes available
Enable enforcement of the use of a Security Key for a user
After you have enforced the use of a security key for yourself you can enforce the use of Security Keys for other users. If you enforce the use of Security Keys for a user who has not yet set up a Security Key, the only way for the user to log in to MyRapidi is for the Account Administrator to reset the user's password. After resetting the password, the user will be able to log in and can then set up a Security Key. So it is better to wait for the users to set up some security keys, but you can force them like this.

image: an overview of users who have the use of Security Keys enforced
Manage Users - Some additional functionality
In order to make it easier for MyRapidi Account administrators to ensure strong security of their MyRapidi Account, we have added additional functionality on the 'Manage Users' page.
First of all, you will be able to see the activity history for each user and what Services the user has access to. As before, you can also reset a user's password, assign or remove admin rights to a user, disable 2FA for a specific user and delete a user. The image below should give you an overview of the possibilities to manage your users.
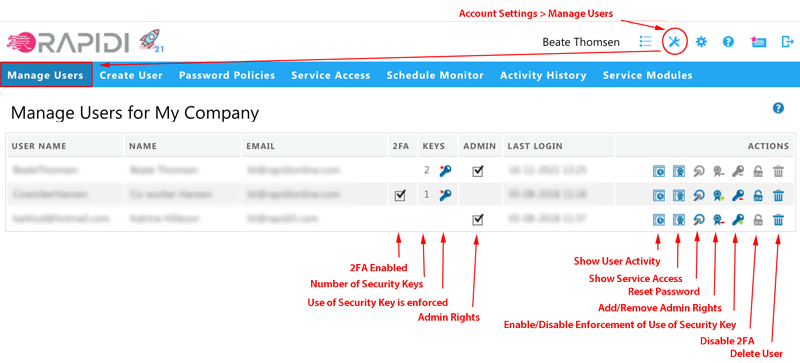
image: Account Settings > Manage Users
Read more on our wiki: Manage Users
New Login procedure
With the support for Security Keys, we have also changed the login procedure so that we only ask you for the relevant information. The login process is now at least a two-step process. The first step will be to put in your user name and click "Continue". The next step will depend on what has been set up for the specific user. If you have set up a fingerprint reader on your laptop, then you just touch the fingerprint reader, and you are logged in.
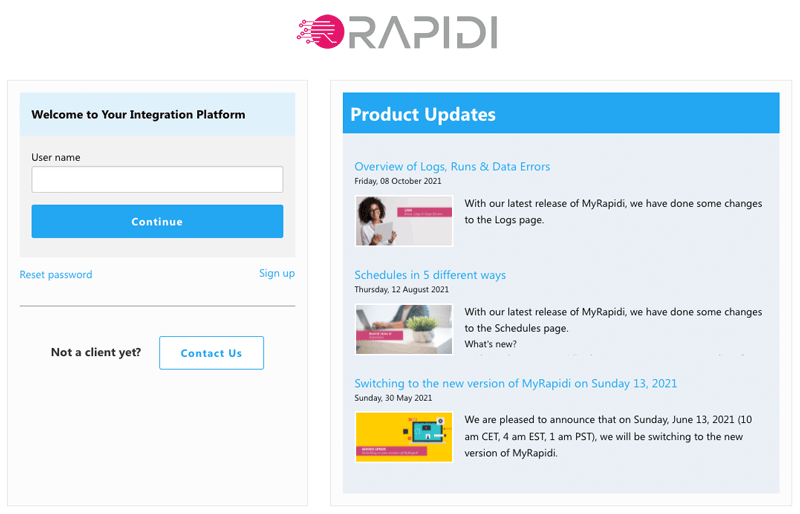
image: new login page
We hope you like the new features and as always, your comments are most welcome!
Your MyRapidi Team