We have been listening to your requests and we are proud to announce a new feature on MyRapidi: Run a Group of Transfers. This new feature will enable you to run an entire group of Transfers at once.
Together with this new feature we have additionally added some quick links and actions for your to be able to work even more efficient with your RapidiOnline Service. Read on to get an overview on the Group feature.
Create a New Group
We will start from the top of the Groups page where we have the new button. This will let you 'create a new Group'. It will open up a new Group section in edit mode for you to fill out. After clicking save it will have all the new functions and links as described below.
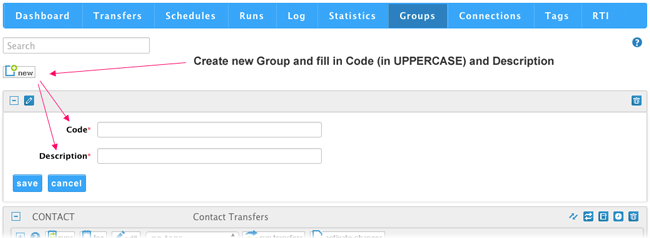
img 1: create a new group
Action Panel as on Transfers
After having created the Group you have the same action panel as you see under the Transfers Tab. From here you can go to runs and to the log entries for this specific Group. Furthermore you can edit the Group, select tags, run transfers and activate changes.

img 2: new Group created with action panel and quick links
Run Group of Transfers
Clicking the "run transfers" button will allow you to run an entire group of Transfers at once. A panel will automatically expand and show you the result.
Kill Group of Transfers
After clicking "run transfers" you have the option to "kill transfers" which will kill the current running Transfer and abort the rest of Transfers in the Group. The "kill transfers" option is only available if you are running a recent version of the central RapidiOnline Service, so if you dont see it, please ask our support to upgrade your central service.
Activate Changes
All these actions in the action panel are working on the Group level except the "activate changes" function which actually is an entire re-load of the configuration (just like the "activate changes" button under the Transfers tab).
The Quick Links Menu
Directly from your List of Groups you have the quick links menu visible to your right. From this menu you can jump directly to see all the Transfers belonging to that Group. Clicking on the Runs or Log icon allows you to jump to the Runs or Log entries respectively. Clicking on the Schedules icon, you can go to the Schedules that are associated to that Group and of course the Delete icon will delete the entire Group (the Group can only be deleted if it is not associated with any Transfers or used on any Schedules).
General Section
Naming and Renaming the Group
In the section called General you can edit your Group (Group Code and Group Description). Please note when renaming the Group you will need to click "activate changes" before running your renamed Group. The rename will automatically change the Group name on any Transfers associated with this Group.
Add Comments and Notes
Lastly but not less important you can add your comments and notes by clicking the comments icon.
We hope this article was helpful and that the new functionality will help you work more efficient with your MyRapidi setup.
Any comments on this or other features you are welcom to leave a comment below or contact us directly.
Interested in learning more about MyRapidi?
Then we would love to have you on one of our Live MyRapidi Webinars.
Sign me up for the webinar.

About the author
Beate Thomsen, Co-founder & Product Design
As Co-Founder of the Rapidi Data Integration platform, Beate has spent over 2 decades on its development, building it around her motto: 'keep it simple, functional yet beautiful.' She holds a Master Degree in IT, Management and Communication and always sees herself as neverending business development entrepreneur with the passion for helping businesses transform, grow and streamline their business operations through Rapidi.